Runtime Package Contents
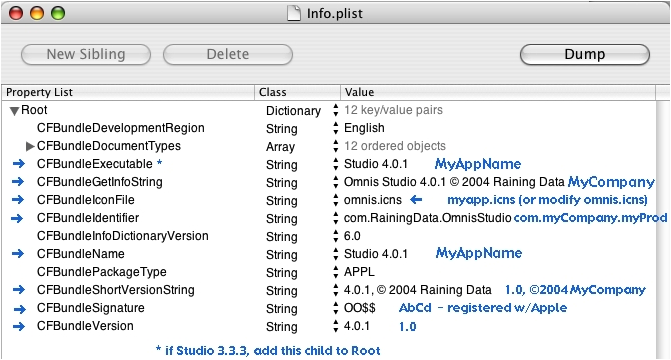
plist file modifications
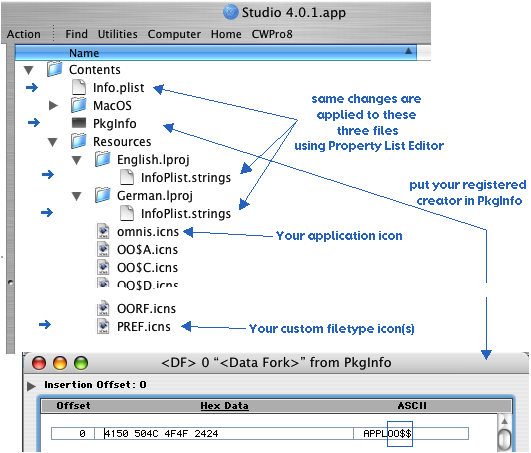
Add custom file type icons

Remove some bundles to save 1.2MB
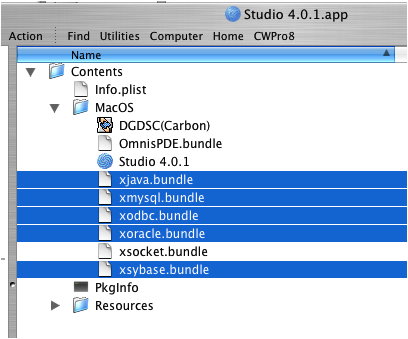
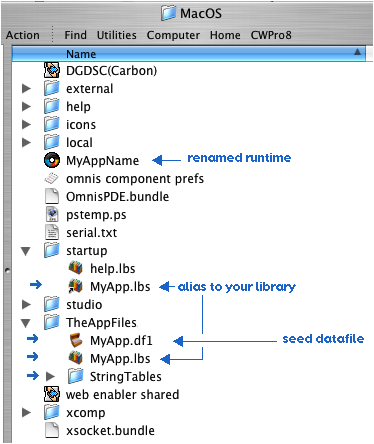
Copy other installed folders into MacOS folder inside package
(already done for you in Studio 4.1 and newer)
Mac Runtime Resource Modifications
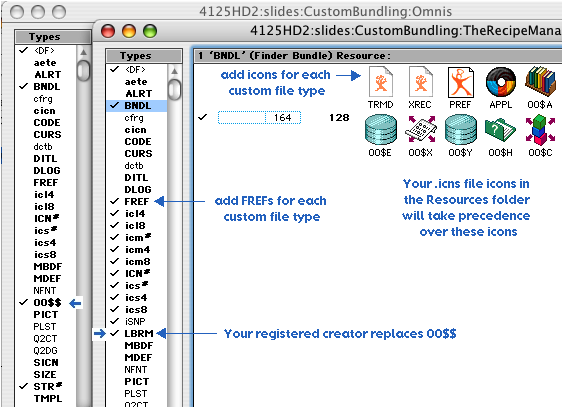
Add your custom file types to the BNDL, add FREFs and icons for them.
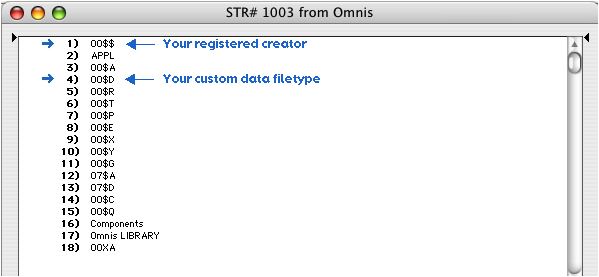
Change OO$$ to your registered creator.
Change string in runtime to match your registered creator.
Change string in runtime to match your custom datafile file type.
* Studio 4.2 - #1 (OO$$) is now CORE_RES_60 in Localizable.strings file in package's resources folder
* Studio 4.2 - #4 (OO$D) is now CORE_RES_63 in Localizable.strings file in package's resources folder
More tweaks in Localizable.strings file....
* Studio 4.x - CORE_RES_1 is "Omnis Studio" - change to your app's name
* Studio 4.x - CORE_RES_3 is "Omnis Studio $ $" - change to your app's name, preserve trailing space and $ characters
* Studio 4.x - CORE_RES_10 is "About Omnis Studio... 10" - change to your app's name, preserve trailing spaces and digits
* Studio 4.x - CORE_RES_53 is " Omnis Studio is an application generator ... " - change to your app's name and description
* Studio 4.x - CORE_RES_236 is " Quitting Omnis due to unrecoverable error: //$ " - change to your app's name, preserve formatting
* Studio 4.x - CORE_RES_577 is "Omnis" - change to your app's name, it appears as a settings group in Page Setup dialogs
* Studio 5.1.1 - CORE_RES_25600 is "firstruninstalldest" - change to your app's name, it names the relocated read/write folder in ~/Library/Application Support for Mac App Store compliance, where nothing is allowed to modify the runtime application package.
More on OS X integration
Add a method to Startup_Task named “$prefs”. It will be called when a user chooses Preferences… from the Application menu.
In development mode, it’s a hierarchical menu offering
both your app prefs and Omnis prefs.
In runtime mode, it’s not hierarchical, and only offers your app prefs.
Get Kevin Gale’s “OSXHelp”
component to take over the Help menu.
Use Apple’s “PackageMaker”
utility to create an installer package.
/Developer/Applications/Utilities/PackageMaker
Use Apple’s “Disk Utility”
app to create a disk image.
/Applications/Utilities/Disk Utility
Get the shareware “autoOpen”
utility to make your .dmg disk image mount with its window already open. http://autoopen.nibfile.com/
Use a browser for online FAQ / Help
;
Send the user to a web browser displaying main FAQ page
;
;
Start out at Main.htm in the TRM_Help folder
Calculate htmlDocPath as con('TRM_Help',sys(9),'Main.htm')
;
Assume TRM_Help folder is beside the OS X package or the Win32 library
Do tPrefs.$getLibBasedFilePath(htmlDocPath) Returns
htmlDocPath
;
If tIsMac9|tIsMacX
Calculate script as con('Tell application "Finder"',chr(13),
'Open "',htmlDocPath,'"',chr(13),'End tell')
Calculate #F as $runapplescript(script,result)
;
Else If tIsWin32
;
Register DLL
("shell32.dll","ShellExecuteA","JJCCCCJ") Returns
result
X250825050
("shell32.dll","ShellExecuteA","JJCCCCJ") Returns
result
; Call DLL
("shell32.dll","ShellExecuteA",0,"open",htmlDocPath,"
"," ",1) Returns result
X250825051
("shell32.dll","ShellExecuteA",0,"open",htmlDocPath,"
"," ",1) Returns result
;
End If
Making a .dmg file
To keep things working with multiple users, the
application bundle must have all or most of the files it contains set to
read/write permission for admin & other users. If you Stuff the app bundle, it loses these permissions when
Unstuffed. So the app bundle
should always be distributed in a .dmg disk image file.
First create a folder with all the distribution files in
it.
Add the "background.pict" background image to
the new folder.
Run Disk Utility. Create a
disk image from that folder.
- choose
read/write Image Format, no encryption
Now double-click and mount the new image
- Get Info on the disk
icon
- paste an
icon of a disk with your logo over the plain disk icon.
- open the disk window in icon view, no sidebar, open View Options.
- choose
‘for this window only’
- set the
icon size to 68 pixels (or your choice)
- turn off
snap-to-grid
- select
the "background.pict" on that disk as the background picture
- size the
window to fit the image and position the icons
While the image is mounted, run Terminal
and enter
this command to make the image file invisible:
/Developer/Tools/SetFile -a V "/Volumes/Your
Disk/background.pict"
(the icon
won't disappear immediately, but after unmount/remount)
Then unmount/remount the disk to make sure things are
what you want.
- set the
window position where you want it to be opened on the desktop
- make sure
the window size still fits the picture, and no sidebar
Then unmount the disk without
closing its window.
Then run DiskCopy and use
the 'Convert...' command to change the disk image to compressed.
The resulting disk image has the background picture and
is read-only, and it should mount with the window open.
But we found that the .dmg doesn't
always open up its window when mounted.
This “autoOpen” utility
solves that problem:
Useful Windows utilities
Get “IconWorkshop” from
Axialis. It will open Mac .icns
files, and save them as .ico files, preserving transparency.
Get “Resource Tuner” from
Heaventools Software. It will let
you replace the Omnis icons with your own .ico files, as well as modify string
and version resources as needed.
Windows Runtime Resource Modifications
Mods for Win32 Omnis Studio.exe
v3.3.3 runtime
(* renamed to TheRecipeMgr.exe)
* TheRecipeManager.exe WILL NOT WORK - too long a name...
TheRecipeMgr.exe
will work
Version 1 resource - various name,
version & copyright changes
Application icons
ICON 1 <- omnis16.ico (16 x 16 -- 8 bits)
ICON 2 <- omnis32.ico (32 x 32 -- 8 bits)
ICON 3 <- omnis48.ico (48 x 48 -- 8 bits)
Datafile icons
ICON 6 <- TRMD32.ico (32 x 32 -- 4 bits)
ICON 7 <- TRMD16.ico (16 x 16 -- 4 bits)
Mods for Win32 omnisdat.dll (* must be renamed to have first 5 chars match .exe name)
Application icons
ICON 1 <- omnis16.ico (16 x 16 -- 8 bits)
ICON 2 <- omnis32.ico (32 x 32 -- 8 bits)
ICON 3 <- omnis48.ico (48 x 48 -- 8 bits)
Strings
StringTable 1
1 - title
2 - version
(* best leave this alone, can cause serialization rejection *)
3 - title
10 – about
StringTable 4
56 - executable name
StringTable 70
1115 - dos version warning
1118 - windows version warning
* omnisdat.dll must be renamed to MyAppdat.dll
(
i.e. con(mid(appName,1,5),'dat.dll' )
Besides replacing omnisdat.dll
with the modified MyAppdat.dll,
and replacing omnis.exe
with MyApplesauce.exe,
you also need to replace omnispic.df1
with a modified copy that
includes a tweaked application icon used in the Help
menu.
-> MinimizeIcons2 page, icon ID 2033
Converting Mac Icons (.icns) to Windows .ico files
1 - Install Axialis IconWorkshop
on Windows.
2 - Copy your Mac .icns files to Windows.
3 - Run the Axialis IconWorkshop, open an icns file.
4 - You should be looking at the 128x128 view, type
control-A to select all.
5 - Copy to clipboard
6 - File menu, New project from clipboard.
7 - In the dialog that comes up, uncheck everything
except for one size/depth,
e.g. 48x48 256 color
8 - OK that, you get a new project with one icon size.
9 - Save that as e.g. “app48x48.ico”
10 - Repeat steps 6-9 for the 32 and 16 pixel sizes
These .ico files will retain your transparency.
I wrote this document, and you’re welcome to use it, if
you also appreciate the fact that it came to be written because Gavin Foster
and Nick Harris organized the Euromnis conference and invited me to present the
topic, and recognize that Raining Data and others who sponsored the conference
also had a hand in making it happen.
Our thanks are due to all of them.
Kelly Burgess
February 2005